Wednesday, December 30, 2015

Securing agent... Failed - OEM 12c

Today I was installling cloude 12c agent on 2 nodes RAC that I got agent deployment failed on first node. While long troubleshooting I found the problem was not in the deployment.  It’s there in time synchronization between Oracle Management Server and RAC nodes. After fixing it got resolved.

Issue:

EM 12c: Agent Secure Fails with Error: "javax.net.ssl.SSLPeerUnverifiedException: peer not authenticated"

[oracle@ccs_node1 bin]$ tail -100f /opt/Agent12c/agent_inst/sysman/log/secure.log

2015-30-12 12:22:40,080 [main] ERROR agent.SecureAgentCmd main.257 - Failed to secure the Agent:
javax.net.ssl.SSLPeerUnverifiedException: peer not authenticated

Cause

 Time synchronization between Oracle Management Server and RAC nodes

 Solution

Fixed time on OMS and RAC nodes and retry on all nodes.

[root@ccs_node1]$ service ntpd stop

[root@ccs_node1]$ ntpd NTP-TEST

[root@ccs_node1]$ service ntpd start


Monday, December 21, 2015

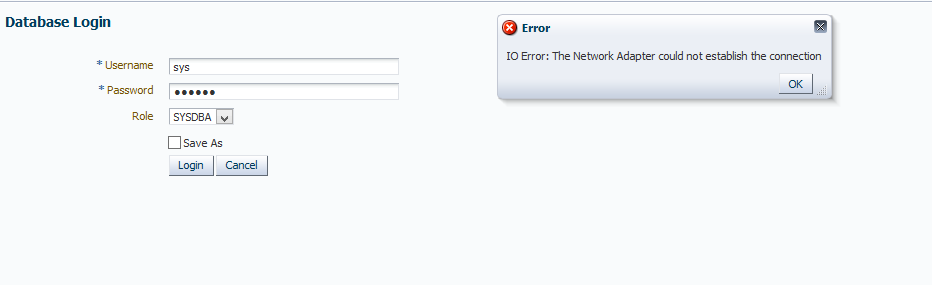
Io exception: The Network Adapter could not establish the connection

For 2 days when I wanted to connect to target DB from Cloud control 12c, the console was throwing this error:

Io exception: The Network Adapter could not establish the connection.

I did some checking on cloud and target DB that listeners and agents was in a correct state but Metalink gave some advice to me :

- check if there is firewall
- check the host name and port number
- check the host, port in the target.xml
- check if the sysman, dbsnmp is locked

After we checked firewall roles with network administrator we found problem on the firewall because of when you register a RAC DB on the Cloud therefore you have to open public ips and SCAN ips policy’s on the firewalls and we didn’t open them. After that the problem resolved.


Monday, December 14, 2015

Data Gaurd Gap Detection and resolved gap

When we using Dataguard, physical standby can go out of sync with the primary database. Before doing anything we need to verify why standby is not in sync state with primary database. We can use of v$archived_log and gv$archived_log views for gap detection. In above views we can check status of APPLIED filed for last sequence number that it has YES or NO value. Therefore If APPLIED=YES then archivelog file applied to standby and If APPLIED=NO this means that due to the missing log MRP is not applying the logs on standby database.

1-ON primary and Standby Database:

SQL> SELECT SEQUENCE#, APPLIED FROM V$ARCHIVED_LOG;
Or
SQL> SELECT SEQUENCE#, APPLIED FROM gV$ARCHIVED_LOG;

SEQUENCE#                      APPLIED
-------------------    ---------------------
      658                         YES
      659                          NO
      660                          NO
As you see we have gap between primary and standby  this means from sequence number 659 doesn’t apply on the standby.

2-Now we can take an incremental backup of primary from SCN where standby is lagging and apply on standby.

On Standby database query v$database iew and record current SCN of the standby database:

SQL> SELECT to_char(CURRENT_SCN) FROM V$DATABASE;

TO_CHAR(CURRENT_SCN)
----------------------------------------
15720350562

Stop Redo apply on the standby database:

SQL> ALTER DATABASE RECOVER MANAGED STANDBY DATABASE CANCEL;

Connect to the primary database as the RMAN target and create an incremental backup from the current SCN of the standby database that was record.

RMAN>BACKUP INCREMENTAL FROM SCN 15720350562 DATABASE FORMAT '/backup/BackupForStandby_%U' ;

3-Copy taken backup from primary to standby database and do a recovery of standby database using the incremental backup.at first you should catalog your backup piece.

$ rman nocatalog target /
RMAN> CATALOG BACKUPPIECE '/test/BackupForStandby _1re6yu5_1_1';

RMAN> RECOVER DATABASE NOREDO;

Starting recover at 2015-12-14 09:23:45
allocated channel: ORA_DISK_1
channel ORA_DISK_1: sid=450 devtype=DISK
channel ORA_DISK_1: starting incremental datafile backupset restore
channel ORA_DISK_1: specifying datafile(s) to restore from backup set
....
..
..
.
channel ORA_DISK_1: reading from backup piece
 /backup/BackupForStandby_%U
channel ORA_DISK_1: restored backup piece 1
piece handle/backup/BackupForStandby_%U
 channel ORA_DISK_1: restore complete, elapsed time: 01:53:08
Finished recover at 2008-07-25 05:20:3
After that start the managed recover :

SQL>ALTER DATABASE RECOVER MANAGED STANDBY DATABASE USING CURRENT LOGFILE DISCONNECT FROM SESSION;

Now you can check value of APPLIED for last sequence number on standby and primary database:

SQL> SELECT SEQUENCE#, APPLIED FROM V$ARCHIVED_LOG;
Or
SQL> SELECT SEQUENCE#, APPLIED FROM gV$ARCHIVED_LOG;

SEQUENCE#                   APPLIED
-------------------    ---------------------
      658                               YES
      659                               YES
      660                               YES

Saturday, December 12, 2015

crfclust.bdb : Grid Infrastructure Disk Space Problem – CHM DB file

Recently, I have come across an issue in 11gR2 RAC (11.2.4), where the GI file system GRID_HOME was mostly consumed by a single file called crfclust.bdb .
crfclust.bdb is a Cluster Health Monitor (CHM) file, which collects the stats of Cluster as well as the OS statistics by means of the Cluster Health Monitor Service ora.crf.
 I have resolved by resize it as following commnads:

1-# df -h

 Size  Used Avail Use% Mounted on
/dev/mapper/vg_emsdb1-LogVol00
                       99G   85G   9G  90% /


[root@node1]# cd /grid/product/11.2.0/grid_1/bin/
[root@node1 bin]# ./oclumon manage -get repsize

CHM Repository Size = 39688312


 Done

2- Change the repository size to the desired number of seconds, between 3600 (1 hour) and 259200 (3 days).on node1 and node2  we'll change repository retention size:

[root@node1 bin]# ./oclumon manage -repos resize 259200
node1 --> retention check successful
node2 --> retention check successful
New retention is 259200 and will use 4524595200 bytes of disk space

CRS-9115-Cluster Health Monitor repository size change completed on all nodes.

 Done

3- on node1 and node2 stop and start ora.crf source:

[root@node1 bin]# ./crsctl stop res ora.crf -init
CRS-2673: Attempting to stop 'ora.crf' on 'node1'
CRS-2677: Stop of 'ora.crf' on 'node1' succeeded

[root@node1 bin]# ./crsctl start res ora.crf -init
CRS-2672: Attempting to start 'ora.crf' on 'node1'

CRS-2676: Start of 'ora.crf' on 'node1' succeeded

4-
[root@node1 bin]# ./oclumon manage -get repsize

CHM Repository Size = 259200

 Done

[root@node2 bin]# ./oclumon manage -get repsize


CHM Repository Size = 259200

 Done

5- Check your root / size:

df -h

 Size  Used Avail Use% Mounted on
/dev/mapper/vg_emsdb1-LogVol00

                       99G   31G   63G  33% /

Monday, December 7, 2015

How to Setup NFS (Network File System) on RHEL

NFS (Network File System) is basically developed for sharing of files and folders between Linux/Unix systems. It allows you to mount your local file systems over a network and remote hosts to interact with them as they are mounted locally on the same system. With the help of NFS, we can set up file sharing between UNIX to Linux system and Linux to UNIX system. Then let me to describe as following commands.
We have a primary server that we have a LUN that his name is /test-nf.
/test-nfs mounted on the server db-test-2 and we want to share this directory for using on db-test-1.

db-test-1 : 10.8.72.24
db-test-2 : 10.8.72.25

1-
[root@db-test-2 ~]# id oracle
uid=54321(oracle) gid=54321(oinstall) groups=54321(oinstall),54322(dba),54323(asmdba),54324(asmoper),54326(oper)
-----------------------------------------------------------------------------
2-
[root@db-test-2 ~]# vi /etc/exports

/test-nfs 10.8.72.0/24(rw,sync,all_squash,anonuid=54321,anongid=54321)
-----------------------------------------------------------------------------
3-
[root@db-test-2 ~]# /etc/init.d/nfs start
Starting NFS services:                                     [  OK  ]
Starting NFS quotas:                                       [  OK  ]
Starting NFS mountd:                                       [  OK  ]
Stopping RPC idmapd:                                       [  OK  ]
Starting RPC idmapd:                                       [  OK  ]
Starting NFS daemon:                                       [  OK  ]
[root@db-test-2 ~]# /etc/init.d/nfs restart
Shutting down NFS daemon:                                  [  OK  ]
Shutting down NFS mountd:                                  [  OK  ]
Shutting down NFS quotas:                                  [  OK  ]
Shutting down NFS services:                                [  OK  ]
Starting NFS services:                                     [  OK  ]
Starting NFS quotas:                                       [  OK  ]
Starting NFS mountd:                                       [  OK  ]
Stopping RPC idmapd:                                       [  OK  ]
Starting RPC idmapd:                                       [  OK  ]
Starting NFS daemon:                                       [  OK  ]
[root@db-test-2 ~]#
-----------------------------------------------------------------------------
4-On the server db-test-1:
[root@db-test-1 ~]# mount 10.8.72.25:/test-nfs /backup/
-----------------------------------------------------------------------------

Be careful if you configured firewall on the Linux, then you have to configure
Iptables by opening tcp and udp ports then restart NFS service and mount again as following commands:

[root@db-test-1 ~]#  vim /etc/sysconfig/iptables

-A INPUT -p tcp -m state —state NEW -m tcp —dport 111 -j ACCEPT
-A INPUT -p tcp -m state —state NEW -m tcp —dport 2049 -j ACCEPT
-A INPUT -p udp -m state —state NEW -m udp —dport 111 -j ACCEPT
-A INPUT -p udp -m state —state NEW -m udp —dport 2049 -j ACCEPT


[root@db-test-1 ~]# /etc/init.d/iptables restart

[root@db-test-2 ~]# /etc/init.d/nfs restart


[root@db-test-1 ~]# mount 10.8.72.25:/test-nfs /backup/  


Sunday, December 6, 2015

Configure RMAN in RAC

For configuration Rman in RAC we can divide processes on the more than one node by configuration multiple channel on the rman as described in the following commands:
In this case we have three nodes:

1-Config tnsnames.ora file on the each node as following scripts:

Node2 =
  (DESCRIPTION =
    (ADDRESS = (PROTOCOL = TCP)(HOST = rac2)(PORT = 1521))
    (CONNECT_DATA =
      (SERVER = DEDICATED)
      (SERVICE_NAME = orcl)
    )
  )
Node3 =
  (DESCRIPTION =
    (ADDRESS = (PROTOCOL = TCP)(HOST = rac3)(PORT = 1521))
    (CONNECT_DATA =
      (SERVER = DEDICATED)
      (SERVICE_NAME = orcl)
    )
  )

2-By configure following rman command we can begin backup with three parallel channels:

RMAN> CONFIGURE DEVICE TYPE DISK PARALLELISM 3 BACKUP TYPE TO BACKUPSET;

RMAN> CONFIGURE CHANNEL 2 DEVICE TYPE DISK CONNECT 'sys/password@Node2';

RMAN> CONFIGURE CHANNEL 3 DEVICE TYPE DISK CONNECT 'sys/password@Node3';

run {
sql 'alter system archive log current';
backup incremental level 0 database format '/backup/backup1/FULL_BACK_%U.bck';
backup archivelog all format '/backup/backup1/ARC_BACK_%U.bck';
backup current controlfile;
}


With above solution you’ll divided processes on the node2 and node 3 but, be careful this way may have network wait.

Also with the following commands you can be turned settings.

RMAN> CONFIGURE CHANNEL 2 DEVICE TYPE DISK CLEAR;
RMAN> CONFIGURE CHANNEL 3 DEVICE TYPE DISK CLEAR;

Friday, December 4, 2015

Generating Automatic Workload Repository Reports:

An AWR Report shows data captured between two snapshots (or two points in time).The AWR reports are divided into multiple sections. The HTML report includes links that can be used to navigate quickly between sections.
You can generate AWR reports using Oracle Enterprise Manager and by running SQL scripts, as described in the following sections:

A. Generating an AWR Report
B. Generating an Oracle RAC AWR Report
C. Generating an AWR Report on a Specific Database Instance
D. Generating an Oracle RAC AWR Report on Specific Database Instance
E. Generating an AWR Report for a SQL Statement
F. Generating an AWR Report for a SQL Statement on a Specific Database Instance

To run these scripts, you must be granted the DBA role.

A. Generating an AWR Report
At the SQL prompt, enter:

SQL> @$ORACLE_HOME/rdbms/admin/awrrpt.sql
Enter value for report_type: html
Enter value for num_days: 2
Enter value for begin_snap: 26142
Enter value for end_snap: 26164
Enter value for report_name: awrrpt_26142_26164.html

B. Generating an Oracle RAC AWR Report
At the SQL prompt, enter:

SQL>@$ORACLE_HOME/rdbms/admin/awrgrpt.sql
Enter value for num_days: 2
Enter value for begin_snap: 26142
Enter value for end_snap: 26164
Enter value for report_name: awrrpt_RAC_26142_26164.html

C. Generating an AWR Report on a Specific Database Instance

SQL> @$ORACLE_HOME/rdbms/admin/awrrpti.sql
Instances in this Workload Repository schema
~~~~~~~~~~~~~~~~~~~~~~~~~~~~~~~~~~~~~~~~~~~~

   DB Id     Inst Num DB Name      Instance     Host
------------ -------- ------------ ------------ ------------
* 1328410674        1 ORCL         orcl1        css-db-test-
                                                1
  1328410674        2 ORCL         orcl2        css-db-test-
                                                2

Using 1328410674 for database Id
Enter value for inst_num: 1
Using 1 for instance number
Enter value for num_days: 2
Enter value for begin_snap: 26142
Enter value for end_snap: 26164
Enter value for report_name: awrrpt_26142_26164.html

D. Generating an Oracle RAC AWR Report on Specific Database Instance

SQL>@$ORACLE_HOME/rdbms/admin/awrgrpti.sql
Specify the Report Type
~~~~~~~~~~~~~~~~~~~~~~~
Would you like an HTML report, or a plain text report?
Enter 'html' for an HTML report, or 'text' for plain text
Defaults to 'html'

Type Specified:  html
Instances in this Workload Repository schema
~~~~~~~~~~~~~~~~~~~~~~~~~~~~~~~~~~~~~~~~~~~~

   DB Id     Inst Num DB Name      Instance     Host
------------ -------- ------------ ------------ ------------
* 1328410674        1 ORCL         orcl1        css-db-test-
                                                1
* 1328410674        2 ORCL         orcl2        css-db-test-
                                                2

Enter value for dbid: 1328410674
Enter value for num_days: 2
Enter value for begin_snap: 26142
Enter value for end_snap: 26164
Enter value for report_name: awrrpt_RAC_26142_26164.html

E. Generating an AWR Report for a SQL Statement

SQL>@$ORACLE_HOME/rdbms/admin/awrsqrpt.sql
Enter value for report_type: html
Enter value for num_days: 2
Enter value for begin_snap: 26142
Enter value for end_snap: 26164
Enter value for sql_id: 2b064udsjh1l
Enter value for report_name: awrrpt_1_26142_26164.html

F. Generating an AWR Report for a SQL Statment on a Specific Database Instance

SQL>@$ORACLE_HOME/rdbms/admin/awrsqrpi.sql

Enter value for report_type: html

Type Specified:  html
Instances in this Workload Repository schema
~~~~~~~~~~~~~~~~~~~~~~~~~~~~~~~~~~~~~~~~~~~~

   DB Id     Inst Num DB Name      Instance     Host
------------ -------- ------------ ------------ ------------
* 1328410674        1 ORCL         orcl1        css-db-test-
                                                1
  1328410674        2 ORCL         orcl2        css-db-test-
                                                2

Enter value for dbid: 1328410674
Enter value for inst_num: 1
Enter value for num_days: 2
Enter value for begin_snap: 26142
Enter value for end_snap: 26164
Enter value for sql_id: 2b064udsjh1l
Enter value for report_name: awrrpt_1_26142_26164.html

Generating Automatic Workload Repository Compare Periods Reports:
While an AWR report shows AWR data between two snapshots (or two points in time), the AWR Compare periods report shows the difference between two periods (or two AWR reports, which equates to four snapshots). Using the AWR Compare Periods report helps you to identify detailed performance attributes and configuration settings that differ between two time priods.
A. Generating an AWR Compare Periods Report
B. Generating an Oracle RAC AWR Compare Periods Report
C. Generating an AWR Compare Periods Report on a Specific Database Instance
D. Generating an Oracle RAC AWR Compare Periods Report on Specific Database Instance

A. Generating an AWR Compare Periods Report

SQL>@$ORACLE_HOME/rdbms/admin/awrddrpt.sql
Enter value for report_type: html
Enter value for num_days: 2
Enter value for begin_snap: 26142
Enter value for end_snap: 26164
Specify the number of days for which you want to list snapshot IDs in the second time period.
Enter value for num_days2: 1
Enter value for begin_snap2: 26156
Enter value for end_snap2: 26164
Enter value for report_name: awrdiff_1_26142_26164.html

B. Generating an Oracle RAC AWR Compare Periods Report

SQL>@$ORACLE_HOME/rdbms/admin/awrgdrpt.sql
Enter value for report_type: html
Enter value for num_days: 2
Enter value for begin_snap: 26142
Enter value for end_snap: 26164
Specify the number of days for which you want to list snapshot IDs in the second time period.
Enter value for num_days2: 1
Enter value for begin_snap2: 26156
Enter value for end_snap2: 26164
Enter value for report_name: awrracdiff_1_26142_26164.html

C. Generating an AWR Compare Periods Report on a Specific Database Instance

SQL>@$ORACLE_HOME/rdbms/admin/awrddrpi.sql
Enter value for report_type: html
Instances in this Workload Repository schema
~~~~~~~~~~~~~~~~~~~~~~~~~~~~~~~~~~~~~~~~~~~~

   DB Id     Inst Num DB Name      Instance     Host
------------ -------- ------------ ------------ ------------
* 1328410674        1 ORCL         orcl1        css-db-test-
                                                1
  1328410674        2 ORCL         orcl2        css-db-test-
                                                2
Database Id and Instance Number for the First Pair of Snapshots
~~~~~~~~~~~~~~~~~~~~~~~~~~~~~~~~~~~~~~~~~~~~~~~~~~~~~~~~~~~~~~~
Enter value for dbid: 1328410674
Enter value for inst_num: 1
Enter value for num_days: 2
Enter value for begin_snap: 26142
Enter value for end_snap: 26164
Enter value for dbid2: 1328410674
Enter value for inst_num2: 2
Enter value for num_days2: 2
Enter value for begin_snap2: 26152
Enter value for end_snap2: 26165
Enter value for report_name: awrdiff_1_26142_26164.html

D. Generating an Oracle RAC AWR Compare Periods Report on Specific Database Instance

SQL>@$ORACLE_HOME/rdbms/admin/awrgdrpi.sql
Enter value for report_type: html
Enter value for dbid: 1328410674
Enter value for instance_numbers_or_all: 1
Enter value for num_days: 2
Enter value for begin_snap: 26138
Enter value for end_snap: 26165
Enter value for dbid2: 1328410674
Enter value for instance_numbers_or_all2: 2
Enter value for num_days2: 2
Enter value for begin_snap: 26138
Enter value for end_snap: 26165
Enter value for report_name: awrracdiff_1_26142_26164.html